Sunday, September 26, 2010

Close Call for the Car Seat Cover

As I mentioned before about finishing a project but I just didn't even want to look at it. This car seat cover was so incredibly hard for me! Not sure what made this one so much more difficult, but it was. I wanted to light it on fire a few times, and I actually did once, but not on purpose. :)

I guess you could call this a refashion as the pink patterned fabric was a table cloth. It was so far from being my taste that I just couldn't be excited about making it. Maybe that's selfish, but the pattern hurt my brain, literally. But my friend loved it and almost cried when she saw it. I enclosed a little note saying, "I hope you like it, but just so you know, you better only have girls, because I don't ever want to do this again!" Lol I went through 8 needles on this project. Two of those needles happened on the canopy alone and within a 10 minute time frame. I pounded my fist on the table, which in turn woke my kids up.
Now as for the lighting it on fire, it was mostly because I was so frustrated with my work! However, the actual fire happened on this part. The blue band in the center is some satin ribbon I had on hand. When I made the strap holes I had to cut a little slit and to ensure that it wouldn't fray I took a match to the edges. Yeah, it caught on fire, but I was very fast with my ninja skills and blew it out. I guess it's special in the fact that it's one of the only car seats that was lit on fire.
The canopy was the fastest part on the project, but it still took a few hours to finish. All of these pictures were taken at 2:00am, hence the horrible quality. I told my husband that I was not going to go to bed without finishing this thing first. I did a little victory dance and posted on Facebook that if anyone wanted me to do a car seat cover in the near future, the answer was a big HECK NO!!!!

Now onto working on some fun refashion projects! Hope you all had a great weekend!

Thursday, September 23, 2010

Who Am I?

Well, I have been so dang thrilled with the response my little blog has gotten since being featured on One Pretty Thing! And I will be on there a few more times this week! A few projects were on there yesterday and will be today and tomorrow. Since being featured a little over a week ago I have had over 5,000 hits on my blog and gotten almost 20 new followers! WELCOME!!! And thank you for thinking my blog is worth looking at!

As I have received so many new followers, I wanted to introduce myself! I always like finding out about a person who writes all the great blogs I follow (which is way more than I care to admit.) It makes them seem real and their "voice" seems more genuine, at least that's how I feel. So here goes!

My name is Kelsee. My mother was a HUGE "Cheers" fan when I was born, so yes, I was named after Kelsey Grammer, which isn't so bad. Had I been a boy my name would have been Nigel, which would have doomed me to be a butler or chauffeur! I was born in Kalispell, MT and moved to Hayden Lake, ID when I was 10. I have an "American Family" with 5 other siblings, but only one of which is a real sibling, my sister. I have one real sister, 2 step brothers and 2 half brothers. I am right in the middle. Life was not always a very happy one when I was young, but I feel that when you are in a dysfunctional family you have two choices: You can let it rule your life and be as dysfunctional as you have been taught your whole life, or you can learn how you don't want to be and be a better person for it. I chose the latter.
I have two amazing kids. Granted, they make me incredibly crazy at times, but for the most part we laugh and play all day long and I feel like they teach me more than I teach them. I got married when I was 18, just two months after graduating high school. Yes, I was that person! And no, I wasn't pregnant! Lol This is me, with my grandpa who walked me down the isle. That little kid in the background is my little brother who is a senior in high school this year! WHAT?!

I learned to sew from my grandmother and my mom. They both made church clothes for my sister and I, also all the costumes I needed for various plays I was in and choir dresses. I didn't really get into sewing until my daughter was born, but working full time made it almost impossible for me to sew as much as I do now.

I have always wanted to be a hair stylist, which may still happen one day. For now though, my hair is an ever changing thing. I love to color and cut my hair, but with the husband's request for me to not cut my hair for a year, it's been incredibly difficult. My family and I call my hair "The Beast!" Why? Because I have the thickest hair ever seen and curly. I tell my hair ladies to thin it, then go back and thin it again, then maybe a third time just in case. I want to feel like I've lost weight when I get my hair cut. It looks like a dead animal on the ground when they get done doing my hair. Here are a few samples of my hair changes in just the last two years.
And yes, I have my nose pierced.

I am horribly afraid of spiders, but who isn't? I am also a huge fan of "Ghost Hunters" but would be such a chicken if I ever went Ghost Hunting.

I feel like I was born in the wrong time period and country. I would have fit right in with Jane Austen or in the court of Queen Elizabeth. I am completely obsessed with the fashions and if there is a movie out that is set in those times, even if it's terrible, I want to see it! Not sure why.

I have never gotten a pedicure. WHAT?! I know, I'm missing out on so much. My problem is is that I cannot stand anything in between my toes! Flip flops are about all I can manage. You know those socks with the individual toes? Those make my skin crawl just looking at them! Lol I know, I'm weird.

When we first bought our house, a year after getting married, I wanted something "move in ready." I didn't want to have to fix anything up. Now? I want something old, lots of character, needs some love that I can transform into my dream home! There is a house down the road that used to be a shabby chic shop that I drive past and long for. Lol My husband just shakes his head. When it was up for sale I almost set up a showing just so I could look at the inside and dream. Again, I'm weird.

Well, that's a little bit about me. I am a real person, with more quirks than the average person, but that's what makes us unique right? Well, that's my mom always tells me, which is probably a really nice way of saying, "You were dropped on your head as a baby and now you're just a little more 'special' than most."

I do have a project to show you, but I was up until 2:00am finishing it, and to be completely honest, I don't even want to look at it as it was a pain in my ARSE to finish!

Happy Thursday!

Monday, September 20, 2010

Bad Pictures, Great Deals

The Thrifty Gods have been smiling down on me lately! The pictures are HORRIBLE, sorry! But I just couldn't hold it in any more and had to share all the great things I've gotten lately!

Now, these weren't actually my find, they were found by my sister-in-law. I have a big one like this of the real butterflies that are going in my daughter's room. She found these beauties and they were only $1.75 a piece!!! They are from Thailand! Sweet.
This desk was a little jewel I found at Goodwill. It needs some work on the top, but for $9.99, I figured it was not a big deal! Yes, $9.99!!!!
This lovely was a Craigslist find. She has a twin that is at my sister-in-laws, and the two were only $20! We both paid $10, great deal! She needs some work done (but don't we all, lol) but she has good bones. Can't wait to revive this beauty!
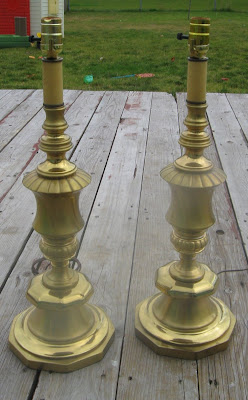
These were from St. Vincent's on their 50% off day! Got the two of them for $8! They are incredibly heavy and in great shape. Just have to decide what color to paint them. Hmmmm.
These are my favorite find! They were also a Craigslist find. The set of 4 for $35! That's $8.75 per chair! They are in great condition and have a few dings on them but they look great! I wanted to paint them white but my husband pitched a big, honkin', monumental fit! Lol Men. Sheesh!
I also got a bunch of clothes too, but that's for another post as a few of the items are going to be refashions! However, for one day of shopping I got 5 tops, 2 skirts, the lamps and the desk for $35! Not too shabby if you ask me! What have you found lately?

Thursday, September 16, 2010

Layered Design Sign Tutorial

I have seen all these amazing signs lately and I've wanted one for my living room, on my big, red, empty wall, for a very long time! My mother-in-law got rid of a few signs that she had in her house and gave me this one, but with it being red and have a giant red wall, I needed to change it. Here's what I did. And, yes, I used my Cricut, but it's NOT necessary!
Supplies:
* Board for your sign
* Primer (Not totally necessary, but I had to cover the red and black paint, it also holds your paint onto the wood better.)
* Three Colors of your favorite paint, or more! (I used what I had on hand, including the free pint I got from Glidden last year!)
*Paint supplies (brush, clean area, whatever you use.)
* Masking Tape/Painter's Tape
* Contact Paper/Vinyl (You can find pre-cut letters at Michaels, Joann's and Hobby Lobby, you can also do it the old fashioned way and print off your letters on your computer, and then trace and cut on your vinyl/contact paper. Whatever works for you.)

Step 1: Paint one coat of Primer and two coats of the color your want your letters to be. I wanted mine white, so I painted just the center of the board with the white. Let your paint dry thoroughly! This is a huge step!!!! Trust me! I am saving you lots of blood pressure issues with this advice!

Step 2: After you paint has dried thoroughly (usually about an hour if its warm outside), take your masking tape/painter's tape and create a straight line on your board to keep your letters from drifting and making your sign look like you were "under the sauce" (if you know what I mean) when you made it.

Step 3: Lay your letters that you have already cut out (which should be step 1 but you get the drift.) This will allow you to evenly distribute your letters and do a rough draft of the spacing of letters.

Step 4: Remove the backing of your contact paper/vinyl and place your letters onto the board. Use the back of a spoon, a pen, a spatula, or if you're really fancy, the tool that you get to press all the sides of the vinyl down. Just make sure that there are no creases in your letters.


Step 5: Paint two coats of the main color you want your board to be. This color green is what was left over from doing the Dr. Seuss room and my stools. Lol I have a lot left over still!

Step 6: After you have let the two coats of the main color dry, place your accent design on top of the board. This is more of a "do as I say, not as I do" step. I didn't let my paint dry and I didn't make sure the creases were out of my accent design. BIG MISTAKE!! I had to go over and hand paint it after I was done, so just trust me. Get all your creases out and again do two coats of your accent color. Allow your board to sit over night, if you can, to let all the coats cure and become hardened. I did not do this either, because I'm INCREDIBLY impatient and I am very upset that I didn't let it sit. When I pulled all the contact paper off the paint was gummy and came up with the letters! So I had to hand paint each letter, which was a total pain! So please, be patient and wait.

After you pull all your contact paper off, it looks like this!

This was the best picture I could get of it. Its a good 4' wide and you can't get the full affect close up. So there you have it! The possibilities are endless! What is your favorite sign that you've seen? My sister made one that said, "You Don't Scare Me, I Have Kids" Cracked me up.

Friday, September 10, 2010

Holy Sha-Moly!

GUESS WHAT?!!!!!

Pumpkin Pie Crafts is on One Pretty Thing today!

What project?


Thanks Rachael from One Pretty Thing for putting my project on your amazing site!

Thursday, September 9, 2010

I Looked Out the Window and What Did I See?


A cat, that is not mine, on my porch table. Our neighbor across the street has this adorable cat, ok as adorable as cats can be, I'm more of a dog person and cats don't really like me much or my sinuses. This cat has deemed our front porch as his thrown. When his owner is gone for the day he sits on our little table waiting for her. She takes him for walks, literally takes him for walks and he follows her! But he has decided that our little table is the best place to nap during the day.

I have gone out there many times to talk to him and he flops all over the place and lets me rub his tummy. He's such a silly cat.
He gets very sad when I go back inside and has tried to come in my house before, but I say, "Sorry pal, but you will make me sneeze!" He does get into our backyard sometimes, which is surrounded by 6' privacy fences, so I have no clue how he gets there, but I guess where there's a will there's a way.
And yes, he brings his friends with him sometimes! For as anti-cat as I am, my yard looks like I'm the crazy cat lady! Oh well, I guess there are worse things to be.

What did you see out your window today?

Tuesday, September 7, 2010

Tie Front Cardigan Refashion Tutorial

My sister came to me with this shirt and wanted me to make a tie front cardigan, like Rosalie wears in "Eclipse". If you've seen the movie, it's her outfit she is wearing when she is telling her "story" of how she became a vampire. If you haven't seen the movie, it's ok, I didn't know what my sister was talking about either. So here's what I figured out for my sister.

Use a shirt that is 1-2 sizes too big.
Step 1: Cut your shirt up the center.
Step 2: Cut the collar off, try and keep your cuts and even as possible. If you get funny ridges after you cut, just go back and even them out.
Step 3: Take a straight edge and use a piece of chalk to mark evenly on each side to create the opening of the cardigan.
Shirt should look like this.
Step 4: Cut where you marked with the chalk.
Step 5: Round the shirt off at the angle.
Step 6: Using a different piece of knit fabric (mine was from a hem job I did for my sister as well, yes, I am her personal seamstress) cut your fabric about 24" long. You can do it shorter, but I wanted these to hang.
Step 7: Cut your strips 2" wide. After they are cut, pull on each end of the strips to make the strips curl.
Step 8: This is a terrible picture! But make a tight zigzag stitch, like a button hole, where you want the ties to come through. My sewing machine did not like this fabric at.all.! But do the best you can. Do this on both sides. If you don't want your shirt to gather too much in the front, make your holes closer to the opening of your shirt. If you want it to gather more, make the holes farther from the opening.
Step 9: Sew your ties on and fold your edges over to run a stitch all the way around the collar and on each side of your opening.

TA DA!!! You're done! Looks super cute!
Totally easy and very fast!

Sunday, September 5, 2010

I've Taken the Pledge

I, Kelsee Webb, pledge that I shall abstain from the purchase of "new" manufactured items of clothing, for the period of 2 months. I pledge that I shall refashion, renovate, recycle preloved items for myself with my own hands in fabric, yarn or other medium for the term of my contract. I pledge that I will share the love and post a photo of my refashioned, renovoted, recycled, crafted or created item of clothing on the Wardrobe Refashion blog, so that others may share the joy that thy thriftiness brings!
2 month pledge
Yep, I did! I'm going to do this for 2 months and have some great ideas and tutorials on the way! I have been wanting to do something like this for a long time and I am finally doing it! So hold onto your seats and wait to be amazed... as soon as I get my camera back. My mother-in-law has it right now to print off a butt load of pictures I have taken in the last few weeks of my kids. But after that, it will be an EXPLOSION OF AWESOMENESS!!!! Be prepared!

LinkWithin

Related Posts Plugin for WordPress, Blogger...