Incredibly inappropriate, but stinkin' funny!

Monday, August 22, 2011
Friday, August 5, 2011
Incredibly Versatle Shirt Tutorial
This is the long awaited tutorial on how I made my daughter's Easter Dress, found here. This is a little different, but only the sleeves. That's the cool thing about this pattern, it's so versatile! This can be made with sleeves, ties, straps, a halter top, or even just a skirt!

Supplies:
*1/2 Yard of Fabric. I used 2 Fat Quarters, but there was only enough left for straps. My daughter wears a 5T in tops, so if you have a smaller little one then the 2 Fat Quarters would work great.
*1" Elastic, measure around your child's chest, under the armpit. Take that number and divide it in half, then subtract 2 inches from that number. So my daughter's chest is 24", so it was 12" for the half and then I cut the elastic at 10".
*Lace for the trim (Optional)
*Scissors, thread, sewing machine.
Step 1: Cut your fabric.
Bottom Piece: Measure around your child's chest, cut that number in half, and then add 6". So I cut 2 pieces 18" wide. The length will be measured from just under the armpit down, so you can make it longer it you want a dress or shorter. Her's ended up being 14".
Top Band: Cut one that is half the length of your child's chest, adding 1/2" for seam allowance. So that piece for me was 12 1/2". The second piece will be the same width as your bottom pieces, so 18". Cut them 4' wide, they will be folded in half.
Straps: Either use lace, fabric, ribbon or if you want to do sleeves, you can use this tutorial for that. Just measure around your child's shoulder from pit to pit. So my daughter was 8".
(Optional and not Shown) Lace Trim: Cut it the same width as your bottom pieces.
 Step 2: Working on the back piece first, pin your top band and bottom piece together, folding you top band in half length wise. Pin them right sides together.
 Step 3: Sew those pieces together. No need to press the seam here, as you will do all your pressing once.
 Step 4: Prepare to snake your elastic through your top band by putting a safety pin on one end, or whatever works for you.
 Step 5: After you have snaked your elastic through the top, pin your elastic so it sits as close to the seam you created earlier. Do this on both sides.
 Step 6: Stitch your elastic on both sides.
 Optional Step 7: Lay your trim right sides together and stitch together. We will press this in a minute.
 Step 8: Now for the front. Make a gathering stitch along the top of the bottom piece. Then do as before, put your top band folded in half and stitch the two pieces together. Then add your lace trim like in Step 7.

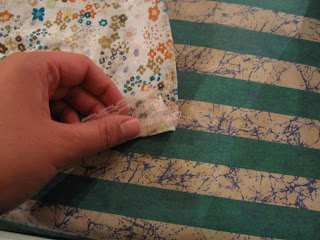
Step 9: Now this is a little hard to see as I couldn't get a clear picture of it, so I will try and describe it as best I can so you can kind of see what I'm talking about. Take you bottom hem with the lace and turn it over so you are seeing the wrong side of you fabric and the seam. Take your seam and overlap it onto the main fabric, I did about 1/4" along the entire bottom. Press it all the way across.
 See the overlapping fabric over your lace? That's what you want it to look like.
 Step 10: Now stitch the hem using your first stitch as your guide.

This is what it will look like in the end. Looks like there is a lace cami underneath. I love that technique.

 Step 12: If you are doing straps then pin them in place here, if you are doing sleeves, then make your sleeves and then pin them in place, same with ties. Then stitch them to your shirt. If you are using lace, then make sure to do a zigzag stitch so there isn't any fraying. I try and get it as close to the top, makes it less noticeable.
 Enjoy your adorable creation!!!!

 I would love to see any of the many variations that this tutorial can make! Send me your links when you make them!

Supplies:
*1/2 Yard of Fabric. I used 2 Fat Quarters, but there was only enough left for straps. My daughter wears a 5T in tops, so if you have a smaller little one then the 2 Fat Quarters would work great.
*1" Elastic, measure around your child's chest, under the armpit. Take that number and divide it in half, then subtract 2 inches from that number. So my daughter's chest is 24", so it was 12" for the half and then I cut the elastic at 10".
*Lace for the trim (Optional)
*Scissors, thread, sewing machine.
Step 1: Cut your fabric.
Bottom Piece: Measure around your child's chest, cut that number in half, and then add 6". So I cut 2 pieces 18" wide. The length will be measured from just under the armpit down, so you can make it longer it you want a dress or shorter. Her's ended up being 14".
Top Band: Cut one that is half the length of your child's chest, adding 1/2" for seam allowance. So that piece for me was 12 1/2". The second piece will be the same width as your bottom pieces, so 18". Cut them 4' wide, they will be folded in half.
Straps: Either use lace, fabric, ribbon or if you want to do sleeves, you can use this tutorial for that. Just measure around your child's shoulder from pit to pit. So my daughter was 8".
(Optional and not Shown) Lace Trim: Cut it the same width as your bottom pieces.
 Step 2: Working on the back piece first, pin your top band and bottom piece together, folding you top band in half length wise. Pin them right sides together.
 Step 3: Sew those pieces together. No need to press the seam here, as you will do all your pressing once.
 Step 4: Prepare to snake your elastic through your top band by putting a safety pin on one end, or whatever works for you.
 Step 5: After you have snaked your elastic through the top, pin your elastic so it sits as close to the seam you created earlier. Do this on both sides.
 Step 6: Stitch your elastic on both sides.
 Optional Step 7: Lay your trim right sides together and stitch together. We will press this in a minute.
 Step 8: Now for the front. Make a gathering stitch along the top of the bottom piece. Then do as before, put your top band folded in half and stitch the two pieces together. Then add your lace trim like in Step 7.
Step 9: Now this is a little hard to see as I couldn't get a clear picture of it, so I will try and describe it as best I can so you can kind of see what I'm talking about. Take you bottom hem with the lace and turn it over so you are seeing the wrong side of you fabric and the seam. Take your seam and overlap it onto the main fabric, I did about 1/4" along the entire bottom. Press it all the way across.
 See the overlapping fabric over your lace? That's what you want it to look like.
 Step 10: Now stitch the hem using your first stitch as your guide.
This is what it will look like in the end. Looks like there is a lace cami underneath. I love that technique.

Step 11: Pin your front and back together and stitch up the sides. Flip it inside out. You can be done now if you want to make this a skirt! Cool right?! If not, continue on.
 Step 12: If you are doing straps then pin them in place here, if you are doing sleeves, then make your sleeves and then pin them in place, same with ties. Then stitch them to your shirt. If you are using lace, then make sure to do a zigzag stitch so there isn't any fraying. I try and get it as close to the top, makes it less noticeable.
 Enjoy your adorable creation!!!!
 I would love to see any of the many variations that this tutorial can make! Send me your links when you make them!
Subscribe to:
Posts (Atom)