Thursday, August 27, 2009

When You Can't Buy, Make!

I received a plethora of patterns from my mom about a month ago and I have been pouring over each and every one of them to see what I can do with them. Well, the other day I just had this itch to have some new clothes, and with our budget right now, that is not an option. So I got out this super cute patter for a peasant top and decided to do it. I had all the stuff and I think I read the pattern about 58 times to make sure I new what I was doing as this was my first piece of clothing that I was making for myself without adult supervision. I think it turned out really nice, but the next time I will have to make some adjustments:
Now, my family and I suffer from a condition called, "Huge Sausage Arm Syndrome" (its a real thing... at least to me) so the next shirt I make I will be making the arms longer to go over my HUGE arms and I might even cut out a few steps and use an old t-shirt and make it look like this. So stay tuned, might be something fun to make! I just have to find the right shirt to chop up... might have to attack the husband's stash. Shhhhh! Don't tell him!

Gift for Under $5.00 Part III

I have really enjoyed making all these gifts as of late, not only because I love the sense of accomplishment of seeing a finished product, but because I know that I made something for very little (if not nothing) and it is special for that one person. Here is a fun baby gift idea. This is for the baby shower I am going to this evening and I figure that my reader that it is for won't be checking her blogs today as she will be driving up here to attend her shower.

So here they are:

The blocks are super easy, just cut out 6- 6" squares, sew 4 squares into a line and then add the extra two squares on the top to form a "T", then just sew the sides together. I used some extra flannel and the top squares are some denim that I was going to make something else out of, but never finished.


Don't you just love these?! I used the same denim as the squares for the outside and some extra fleece I had for the lining. I got the pattern from this site. They were very easy to make as well and the only thing I had to buy on this was the elastic which was about $1. I did the applique on the top and hand stitched around the dinosaur and its back. It was very east and I just love how warm then are.

So there you have it. Another installment of "Gifts for Under $5.00!" If you have any questions on how to make these, please let me know. I will be more than happy to assist your crafty needs!
DIY Day @ ASPTL

Sunday, August 23, 2009

Ready For Fall!

I don't know about you, but I have had about as much summer as I need! Just the fact that those words are coming out of my mouth is going to haunt me this winter when it seems like the sun will never come out! Living in North Idaho, the winters last from November to around April sometimes. So I'm sure I am going to look back on this and kick myself! However, one thing that is good about summer is that our garden is doing really well, the bad thing is is that we have more veggies than we know what to do with and I can't keep up! Plus with it being so warm out, I haven't been able to bake them into all the lovely, wonderful goodies that all remind me of fall. So today I shredded up a bunch of zucchini to freeze and also made some Zucchini Bread. It freezes really well and I made them into muffins too so I can freeze those and take them out when my daughter wants something other than cereal or oatmeal for breakfast. Here is the recipe that I used and it turned out AWESOME! My house smells like a bakery and I love it!

Ingredients:
3 Cups Flour
1 teaspoon Salt
1 teaspoon Baking Powder
1 teaspoon Baking Soda
3 teaspoons Cinnamon
3 Eggs
1 Cup Vegetable Oil
2 1/4 Cups White Sugar
3 teaspoons Vanilla Extract
2 Cups Grated Zucchini

Directions:
1. Grease and flour two 8X4 inch pans. Preheat oven to 325 degrees.
2. Sift flour, salt, baking powder, baking soda and cinnamon together in a bowl.
3. Beat eggs, oil, vanilla and sugar together in a large bowl. Add sifted ingredients to cream mixture, and mix well. Add in zucchini until well combined. Pour into prepared pans.
4. Bake for 40-60 minutes or until a toothpick comes out clean in the center. Let bread cool in the pan for 20 minutes on a cooling rack. Then remove bread from pan to cool completely (which I never do and usually have it gone before this last step.)

And there you have it! Your house will smell so fabulous and it will remind you of a cool day after a tromp through the pumpkin patch! At least it does for me.

UPDATE: This can be converted to muffins as well. This recipe will make one loaf of bread and one pan of 12 muffins. Just adjust your cooking time for the muffins to about 20-30 minutes. Just keep an eye on them and pull them out to cool while the bread continues to cook. Had an email on that one! Enjoy!

Wednesday, August 19, 2009

Gift for Under $5.00 Part II

As I have said in previous posts, this is the month of birthdays, weddings and BABY SHOWERS!!! I will have baby things next week (as some of the gifts are for one of my readers and I don't want to spoil the surprise.) But here is a creation that is for my nephew that turns 2 this week! He's such a big boy and loves to do everything his daddy does, and with his daddy being a roofer, I figured I would have to make my nephew a tool belt like his dad's.

Here's what I used:

Nylon strap from a back pack we never use with a clip on it
Black Fabric

I first cut the belt to fit and sewed up the sides. Tip: Make sure you have a Heavy Duty needle or your sewing machine will hate you, which is not what I had.

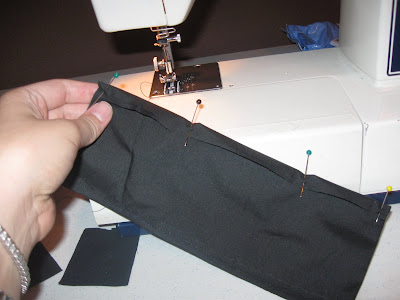
Then I cut a strip of fabric, about 1" in width (the belt was 1 1/2") and I sewed up the sides and then stitched it onto the belt. I used my finger as a guide for each loop on the utility part of the belt.

I made little seams to make 4 loops.

I then made the pocket for the other side. Now this one was a little tricky, at least for me and my very limited sewing skills. But I cut a long piece of fabric about 4 1/2"X6 1/2". I stitched up the sides. Now I don't have pictures of this as my sewing machine was in shock from the nylon, but I took two squares and stitched them onto the top of the fabric to make a big "T". Then I stitched each side of the little squares onto the long strip to form the pocket. I then wrapped the strip and its pocket that was turned inside as to make the little pouch and stitched on the top and bottom to secure the fabric.

I then wrapped the strip and its pocket that was turned inside as to make the little pouch and stitched on the top and bottom to secure the fabric. Now as I was doing this on the super cheap, I didn't do this step, but you might want to put something inside to make the pocket a little more stiff. I didn't have anything that would work, so I didn't do it, but some stiff interfacing or some cardboard would work great.

Now for the "Hammer Loop". I just took a small scrap of fabric and made a loop and stitched it onto the nylon, right next to the utility loops.

There you have it folks! A child sized tool belt. You can also add another pocket on the back or whatever you want! As this little guy is not super big, I was limited as to what I could put on there, but just use your imagination. I also had to Google pictures of tool belts to get my inspiration. How much did this gift cost me? NOTHING!!! All of the material were things I already had, at least this part of it. There is a small set of wooden tools that the grandma is providing for this gift, and it will work very well!
DIY Day @ ASPTL

Saturday, August 15, 2009

Gift for Under $5.00 Part I

My sister-in-laws birthday is on Thursday and we are hosting her party. I wanted to make her something fun, but with the limited funds we have right now I had to make it on the cheap. My mother-in-law found this purse patter for free from Made By Rae called the Buttercup Bag. Check her blog out, she has some great ideas on there! I've had this pattern in my files for months now and just never made it. So I got it out and decided I would make this for her with fabric I already had, so this gift was completely FREE!!!

It turned out so cute, that I think I might need to make myself one, only I need a bigger one.

The fabric I had on hand was from an apron I made myself a few months ago and I had some leftover, just not enough to do the whole purse in it, so I had to use other scraps I had. My sister-in-law is an Anime lovin' kind of girl, so the Japanese themed fabric is perfect.

The magnetic clip was from an old purse I have that has about 7 of them on there, so I just cut it out and transferred it onto this purse!

This purse took me a total of an hour and a half to make, but only because it was my first thing to make like this without help from my mom or mother-in-law, so I took it slow. I love it!

Monday, August 10, 2009

Homemade Baby Food Tutorial

Now, just so you all know, I have been working on this post for about a week. I didn't want to give bad information and have someone come back and sue me for making their child sick. So let me just say this now: I am NOT a certified nutritionist, I have NO background in the medical field and I am NOT an expert on fruits and veggies. I am just a stay at home mom, trying to save a few dollars, and feed my family healthy meals on an extremely tight budget. There, now that I have cleared the air, take my tips, do your research as I did, consult your pediatrician as I did, talk to your local produce guy as I did and just use your "Mommy Instincts", you know the little voice in your head that says, this may not work for me or my child.

Now this tutorial is pretty basic, but I did two different foods. I made pears and carrots. With summer here, the cost of produce is extremely cheap as everything is in season right now. We were spending anywhere from $40-$80 a month on baby food alone for our little man, (he eats like a horse! I'm a little nervous about what he's going to be like as a teenager!) So all of the food that I have made, I have done so for under $20! I have enough food to last us until the end of September or longer. Most of the food I have made were grown in my mother-in-law's garden, so those were free.

Pears:

As pears are a fairly tender fruit there was really no preparation with them. Just wash and cut them into chunks and put in the food processor (if you are lucky) or blender (if you aren't.) The blender works fine though, just their little motors give out fast if you put too much in at a time.
*Wash Your Fruit Thoroughly

*Cut into Chunks
*Cut out the centers as they can be tough where the seeds are
*Put in your blender/food processor 2 cups at a time

*Add formula or breast milk an ounce at a time and blend until it is the desired consistency (For Stage 1 babies, you will want it pretty soupy, but for Stage 2 babies, you will want it not as soupy, just work with it and you can always add rice cereal to it when you are preparing for baby to eat to thicken it up.)

*Pour food into ice cube trays, cover and freeze! Its that easy!

(This is 3 pears worth!)

This method works well with soft fruits such as pears, bananas, peaches, plums, blueberries, strawberries (pretty much all the berries, but you don't want to do straight berries as it will be too acidic for babies tummies and might cause issues... the messy kind!)

You don't have to add any kind of sweetener as it is not recommended. Never use things such as molasses or honey as there is this not so fun thing called botulism and babies can get it from both honey and molasses. If your fruit is a little tart, like the peaches, add just a very small amount of baby apple juice to your mix. With applesauce I added a little bit of sugar and cinnamon but not enough for it to cause any problems, but that is not a good idea for Stage 1 babies. As my son is 7 months now, he is ok for a little bit of spices. Check with your pediatrician to see what they recommend for sweetener, especially if your baby has a sensitive stomach.

Carrots:

Rule of thumb: Anything that is crunchy, it needs to be steamed first. The main ones are carrots and apples. I peel my carrots as the outside layer is what makes them a little bitter, but you really don't have to. We got a 10lb bag of carrots at Costco for $3.99!! I have enough carrot baby food to last for months, but my boy would be orange if I let him eat it every day.
*Peel Your Carrots

*Chop into Chunks
*Put in a pot of enough water to just barely cover your carrots.
*Put on Med to Low heat (this way if you have to take care of something else you aren't over cooking them if you are gone for a little while.) Cooking time will vary! It depends on how much is in the pot, what temp you put it on, how much water is in there, lots of things. So just keep an eye on it, once the veggie is tender they are ready.
*Take out, put in blender/food processor 2 cups at a time
*Add an ounce of formula or breast milk at a time until it is the right consistency.
*Put in ice cube trays and cover to freeze.

(This is not even half of the 10lb bag made up! 5 full ice cube trays worth!)

How to Reheat:
1 Cube = 1 Serving for Stage 1 Babies. 2 Cubes= 1 Serving for Stage 2 Babies. Now everything that I read said not to microwave when reheating your food, but honestly, when your child is screaming like he is wasting away, its really your only option. Just make sure to stir a lot. Now again, cooking time will vary as some of you might have a better microwave than I do, but I start off with putting my cubes in microwave safe bowls and heating them for 1 minute, as I do 2 cubes in each bowl it takes a little longer, with Stage 1 babies you will want to start with 30 seconds and then go in 20 second increments after that, stirring constantly. After my one minute I stir it, the fruit usually takes less time to cook so I stir them both and put them in for another 20 seconds. The fruit is done but the veggies need more time, so I do another 20 seconds. Play with it, make sure that it isn't too hot. If it is, add a little cool water to your bowl and a little cereal to thicken it up again. Remember to stir constantly and again, don't over cook because if you scorch your food it will lose all nutrients, so heat it slowly.

Try different variations, we mixed the pears and bananas as my son decided he doesn't like bananas anymore, but he loves them now!

Tips:
*Don't add butter to your mix, your baby cannot process extra fats like that, and your food doesn't need it.
*Never give unripe fruit or veggies. If your bananas are green, wait a few days. If you are not sure about how ripe your produce is, make friends with your produce guy, mine's name is Joe.
*If your baby is refusing to drink formula/breast milk, add a little extra in with the food.
*Introduce a new food every 3 days to make sure your babies stomach doesn't react to what you are feeding him. (That was from our pediatrician.)
*Do your research. I used every source I could before doing this. Yes, my motivation was to save money, but I didn't want to be giving my child anything that would hurt him. I talked to our pediatrician extensively on this and she told me it was actually better to make the food than to buy it as there are no preservatives.
*Use frozen veggies over canned veggies. They are better for you and not packed with preservatives and water.
*You don't have to go organic, but it is a good idea. If you trust your produce section and they have locally grown stuff then go with that.

I hope this helps and have fun with it. My little boy just loves most of the foods I have made for him. We have a stock pile of squash/zucchini, pears, apples, peaches, green beans, peas, carrots and bananas. It may take a little more time, but knowing that he is eating fresh stuff makes me feel better. Plus, he has always had a very sensitive stomach and gets constipated easily (I know, T.M.I.) but now, he has no issues at all. Makes me happy. And he is happier too! See~


DIY Day @ ASPTL

Saturday, August 8, 2009

Oh Baby!

I love me a good baby shower! I have planned a few and I just love them. As I have so many baby showers that I am going to this month, it is baby city here! I have gotten a few emails from friends asking what I am making, which is a secret or at least until I can get the piece for my sewing machine that broke.... grrrrrr! However, here is some inspiration on gifts or shower ideas that might be helpful. One thing that I love to do is make is a diaper cake. I know you have seen them in blog land or on Martha Stewart.

This diaper cake I made for my sister's last baby:
I use size 1 diapers, roll them up and tie them with ribbon. I decorated this one with different balls that when you open them in water they turn into rags that I found at the Dollar Store. I also do bibs, receiving blankets, hats, bottles, sample soaps, anything that is super cheap really.

Now if you are hosting a baby shower, here is a super fun and personal idea that I did for my sister's 2nd baby (she only has 3 kids and I wasn't invited to do the first one, sheesh!) I planned this party out the second we found out she was having a girl. I did a tea party in the garden as it was in August and it was gorgeous out. I decorated the tables with quilts and did fresh flowers in little terracotta pots. I sent out the invitations about a month in advance as I sent each guest a square of fabric. On the invitation I told everyone to do something personal on the square that would last forever as I put each square together and made a big quilt that hung in the nursery. Now for the life of me I can't find a picture, but then again it was a few years ago. It was such a fun and personal gift that I got to give and with both the grandma's, great grandma, cousins, and various relatives all together on one quilt, it was precious.

Another fun idea is to do a "Time of Day" Themed party. On each invitation, send out a time of day that the person is to buy a gift for, and you can also put on there "11:00 am Feeding" or "Noon Nap" (then you don't get lots of gifts around feeding or sleeping.)
Another gift idea I did for my sister-in law was I took a baby bath, a pair of jammies, and some diapers and I rolled the diapers inside the jammies in the arms and legs and stuffed the rest of the jammies and hats for its tummy. Then I added some rags and soaps around the "baby" and wrapped it in a towel. The head I just rolled up some diapers and put a hat on it. The only thing about this gift is if they don't have a good sense of humor it might freak them out a little as it does look real at first glance. But I thought it was super fun and had all kinds of things inside this little package. (Here is a picture of it all wrapped up.)

I guess I just took that old adage of "Presentation is Everything" just a little too far. I have always had a fascination for making my gift stand out a bit. Hope this has solved a few of the "Baby Present Blocks" so many of us have when we are sent an invitation. If you have a fun and unique idea, share it! I love new inspiration!

LinkWithin

Related Posts Plugin for WordPress, Blogger...