Monday, June 11, 2012

What I've Been Up To

Wedding season has officially arrived!  I have been a busy little bee making lots of custom orders for garters, veils and alterations.  Here are some pictures of some of my latest creations!

This is a set that I made for a friend from High School.  This is for her little sister.
 She wanted pink, so we added the pink centers to the flowers and a little extra bling.
 This was designed by the Maid of Honor!  The bride's colors were white, ivory and champagne.  Very romantic and vintage!

 This is the message she wanted me to add to the inside of the keepsake garter.  I used a font called "Jane Austen" which I love!
 This garter was designed by the groom for his petite bride.  I used vintage lace that I got at the Farm Chicks show last weekend.
 This was probably my favorite garter so far.  This was a collaboration with a fabulous bride.  I am going to start making this design as an option in my shop.  Very fun and fancy!

Hope you all are doing well!  I have some other projects that I'm hoping to do some tutorials on soon.

Thursday, May 24, 2012

What I've Been Up to Lately

Well, I didn't mean to take a long break, but I had no time to add this blog to my list of craziness.  I have been doing well with my little shop and it has kept me busy.

 Here are a few of the things that I've made for different brides lately:


I was asked by Apple Brides, (a local blog for brides that holds all kinds of fun info on photographers, venues, florists, caterers, ect.) to make a garter set for a photo shoot they were doing at a brewery.  The theme was a French, romantic theme with red and black.  I was so excited to be asked and even more excited to show what I can do.


Then this past weekend I was asked to participate in a Fashion Show for my friend who owns the bridal shop that I do alterations for, Rianne's Bridal.  My pillows were used for all the flower girls and my daughter was a model, which of course she rocked it.  I made 3 new designs for the show, that I will post pictures of late.  It was a lot of fun!


So as you can see, I have not been idle.  I have been a crazy creatin' machine.

The Incredibly Late Birthday Party Post


Well, my baby girl turned 5 at the beginning of April.  Yes, I'm insanely late in posting this I know, but better late then never.  We spent her actual birthday with a picnic in the park followed by dinner at Olive Garden (her choice) for dinner.  She's so spoiled, but it's a special birthday!

Playing nice with her brother on the slide.
 Now, for the fun stuff, the party.  She wanted a Fancy Nancy Tea Party.  I wanted to do something vintage.  We met in the middle. I ordered a few vintage tea cup sets and borrowed vintage table cloths and doilies for the decorations.
The menu was comprised of fruit kabobs, pigs in a blanket, PB&J finger sandwiches, rice crispie pops dipped in white chocolate that was colored purple, chocolate dipped pretzels, and the "tea" was some Homemade Cherry Limeade.

The decorations were very simple.  I took twine and folded paper doilies (from the Dollar Store) and glued them onto the twine garlands.  Then I added the paper Pom Poms in the middle, they were one of the "Free Shapes" from Silhouette.

 Zoe asked for cupcakes, not cake, this year, so I made very fancy, bright pink frosted cupcakes.  She wanted chocolate cake, so I made her happy.

 She had lots of friends and family come.  This is my Uncle with one of his daughters.  He was such a good sport sitting at a very girly table and having a tea party with all the kids.
 Zoe and her cousin. Or Ebony and Ivory as we like to call them.
 My nieces.
 And after the party, all the kids wanted to play outside, which was fine with me.

All in all, it was a very low key, fancy and fun party this year.  My family gives me a hard time about going overboard with parties, but this one was actually pretty fun for me to do. 

Friday, March 16, 2012

Busy Little Bee

It's been a while! Sorry ladies. I got a little swamped with alterations these past few weeks. It's prom season, so I've been taking in the already Size 0 dresses an inch or two. Seriously, why are girls so SMALL?!! And I also have to say that the dresses that I've done are not that pretty. I've done bridesmaid dresses that were much prettier than those! I also got to take the zipper out of a wedding dress and add a lace up back, which was a first for me and I seriously love how it looked in the end. Pictures below.
But first, I have to share my newest listing from my shop! I am very excited about them and have more to come.
And here is the dress that I got to alter. It was such a gorgeous dress and of course I didn't take a picture of the front. Oye.
Before:

After:

And in other news, here is a little taste of some of the new things coming to the shop!
Exciting times! Hope you all have a great weekend!

Wednesday, February 22, 2012

Sewing Classes Part 1

For Christmas I asked my mother for sewing classes. I know, I'm a total nerd. I mean, who asks for "school" for Christmas?! THIS GIRL! It's a program that is offered through our local college's "Workforce Training" courses. The class that I REALLY wanted was specific to tailoring, as it is getting closer to wedding season and I want to be ready with all the know-how on all the alterations I will be doing. Last year I kind of started doing alterations without really knowing what I was doing, but I learned as I went along and have become pro at it! The only thing is is that I don't know how to do all the fancy seams at the bottom of a bridal gown so I can't hem it for any of the brides. I can take that sucker in or let it out, no problem, but I can't hem it, sorry. Not really a thing a bride wants to hear. So, back to the class, in order to do the advanced class I have to complete the basic class. Some of the things are a little redundant, and it's a bit boring for now, but I'm excited because I am actually getting to learn all the proper terms for specific stitches. I know that they all have special names, but I just know them as the "Fold It Over One" or the "Curvy One." Very scientific, I know. I am however looking forward to learning more, especially with the advanced class. That one is going to be so much more challenging and I am looking forward to it.

(If only we all looked this pretty while sewing. Instead I wear my sweats, no makeup and I have a can of Diet Dr. Pepper next to me.)

Other than that, my life has been a bit quiet. Other than trying to organize my kids' rooms. It's going to be a month long project and I might not make it out alive.

Saturday, February 18, 2012

A Thrifting I Will Go!

I was in some desperate need of some retail therapy today. So I loaded the kids up and we headed to St. Vincent's in search of...well, not really anything in particular (which can sometimes be dangerous for me). Luckily, there weren't so many treasures that I spent a ton of money, but I did walk away with some fun things! Check it out:

First, I got two mens' shirts that I will be using for a tutorial I am cooking up. Stay tuned for that.


Sheet Music from 1938. Gotta love us some vintage sheet music!


A bag of trims. I like looking in the "Odds and Ends" bins by the fabric. Sometimes you can find some fun little things. I love this lace and I think I will use it in some future garter designs for the Shop.


I found this pink hounds-tooth, yummy goodness in the fabric bins! This stuff can get spendy, but if you find it, you GRAB IT! This fabric will become some clutches that I want to sell in the Shop.


And last but not least, a tea pot. You might not think this is a huge find, but I am planning a "Fancy Nancy Tea Party" for my daughter's 5th birthday and this is one of the many items that will be used for decorating and creating a fun table-scape. Love it! Plus, it was only $2!!!! Can I get a What What?!


The Grand Total for this little trip was........$10.57! Not too shabby if you ask me!

Did any of you go thrifting this weekend?

Wednesday, February 15, 2012

I Just Can't Quit You

Hello? Is anyone still out there?

I sure hope so. I know I said that I was going to quit this blog, but I have felt a little lost since doing so. I feel like I have lost that sense of "community" in the creative world and to be honest, my husband is a little sick of me trying to explain the difference between chiffon and organza. So I need my girls. I need to have that sense of accomplishment back. I need a place to share something that I've done, to make new friends and to have a place where I can express myself.

I have entered in a TERRIFYING world of having a business. I opened up an Etsy shop, which I have wanted to do for years, I have just been too much of a chicken. I'm still uncertain of myself, which is a new feeling and I don't like it, but I feel like being back in "Blogland" will help to ease those fears.
What is this new venture? Well, my shop is called Vintage Vanity, LLC. Go check it out! I would seriously LOVE some feedback on it! So, please share any thoughts you have. I have only had the shop open for a week now, well, I have only had things listed for a week, and I'm trying to keep my chin up. I have had my garters in a local bridal shop for a few months now, which has been fun and I have gotten some interest locally, which makes me happy. I have many, many ideas and new designs so the shop will be changing constantly. I have a Facebook Page set up for it too, so go follow me there too. Vintage Vanity, LLC.

Other than having all my dreams come true (that includes those insecurities that make you have the dream that you show up to school naked) what have I been up to? I have been attempting to organize this house. We decided to hold off on selling for one more year as the market here is brutal. So I will have posts on making SUPER SMALL places more functional.

Another thing I have done since I spoke to you all is I put some pink in my hair. Yup, I am a 27 year old trying to go a little more Rock-Star! Or, trying to get all my "Midlife Crisis" things done before I am that age. However you want to look at it. Here's a picture of it. And I have to add that my hair stylist was upset about me doing it but is now posting lots of fun colors in her "Hair" file on Pinterest. Hmmmm. Coincidence? I think not!
Well, there you have it. I will be around more often. I hope to make this blog into what I want it to be and I am ready to do that now. Plus, I got a big Starbucks gift card for Christmas, so I will be well caffeinated, which also helps.

Anything new with any of you?

Saturday, January 7, 2012

Signing Off

Hi ladies. I have made the incredibly hard decision to sign off of my blog. This year is all about change. I started up my little business (find me on Facebook at Vintage Vanity). I am also going to be taking classes on Alterations at our local college, starting in February, so I can further that part of my business. And last but not least, we are getting our house ready to sell in the summer time. Needless to say, I will be incredibly busy and I will not have the time to put into this blog.

I want to thank each and every one of you for following my little blog and all the nice comments I have gotten. I have made many new friends in the blog-world and I am so grateful for that. I wish you all well and hope that this year will be full of wonderful changes, like mine is.

Farewell Friends,

Kelsee

Sunday, December 11, 2011

Child's Apron Tutorial FINALLY!

Sorry for the lull this past week. I got a fun case of food poisoning/bug that kept me on the couch or in the bathroom for a few days and it's taken about a week to feel normal again. I started this tutorial before I got sick, so it's taken me several days to actually finish sewing these.
I love tutorials that are versatile. It's like two in one. This is one of them! You can use these steps to make a half apron or a full apron! I love both!

Let's get started!

Supplies:
*1/2-3/4 Yard of fabric for bottom layer, waistband, and ties
*1/2 for top layer and bib part
*Iron and Ironing board (Sometimes you can fudge and skip the ironing part, but with this you can't. It would look so wobbly and it would not lay right, so get ready to iron...a lot.)
*Basics- Sewing Machine, thread, pins, tape measure, rotary cutter and mat (not mandatory, but makes things go faster.)

Step 1: Let's start by cutting all your pieces out. This apron is perfect for scraps of fabric. That's exactly what I used, so my measuring was a little interesting. But you can make it work however you want. For the bottom piece: I made these for my nieces who are 8 and 6. I took their measurements of their waist and based everything off of that. Both had a waist of 25". So your bottom piece needs to be Half of that measurement+6" for a gather. Mine came out to 18.5", so I rounded it up to an even 20". Then determine the length you want. Mine was 10.5", keep in mind that you will have to hem it so give yourself your seam allowance, mine was 1/2".

The top layer needs to be smaller than the bottom. Make the top 3" shorter than the bottom layer and 1.5" shorter on the sides. So mine was a rectangle of 9"x17".

If you are making this a full apron (you can do both with this tutorial!) determine how wide and long you want yours to be. It depends on where you want the waistband to sit, if you want it more of an empire waist, then make your bib shorter, if you want the waistband to sit lower then make it longer. As you are going to fold over the top of your bib by 3", allow the extra fabric. Mine ended up being 11"x10". Don't forget your seam allowance!

Now for the ties and waistband. For the waistband you want to cut 2 pieces that are 3"x however long your measurements are. I wanted mine to be well behind the back, so it went all the way around, so with my measurements I made it 22". You can just rip your fabric for this, it saves time.

For your ties in the back, cut 2 2"x however long you want them. I like to have the girls' aprons tie in the front, so it has to be long enough to wrap around them. They ended up being 45" long.

For the necktie, cut it at 2"x 35-40"

Remember to iron all your fabric after you cut it so you start off with clean lines.

Step 2: Fold the bottom layer in half. Use a cup to trace at the corner and cut around your curved edge.

Step 3: Do the same for the top layer, fold it in half but with this one you will make a half circle. I just eyeballed it, but if you have a method you like, go with that.
Step 4: Now for the bib. I had to line my bib part because the fabric was too thin. Iron your sides to finish the edges. I did a half inch, then I folded the raw edge in and ironed the edge. This creates a clean hem. (If you want to make a half apron, skip this step and move down to Step 6)
Step 5: Now fold your bib piece down 3" and iron it flat. This is going to be the place for your necktie. Stitch across the raw edge.
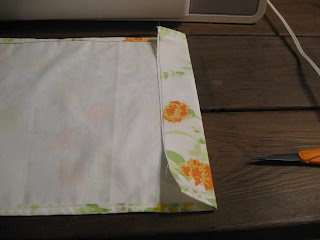
Step 6: With most aprons you finish the edges before you put it all together, that's what we do next. As this is a curved edge, either use a rolled hem foot on your machine or if you're like me and couldn't find your foot without waking a child up, just go slowly and make a loose twist on the bottom. This takes some patience. Just go slow and just make sure your raw edge is folded under so you can't see it. You will have to iron your pieces after you finish to get them to lay flat as they might want to curl a bit, but it actually looks cute.

Do this with both the bottom and top layers. If you want, you can add lace trim after your hem is done.

Step 7: Make a gathered stitch on the top of your two layers. Gather both pieces to the desired length you want.
Step 8: Fold your bottom layer, top layer and one piece of the waistband in half. Once you find the center of each piece mark it with a pin, chalk, pen, anything that will stand out for you. Lay the two layers on top of each other, with the center marks lined up. Lay your waistband on top of your two layers, center mark lined up, and pin it to your layers, right sides together. It's easier to start from the center and work your way out.

Step 9: Stitch the three pieces together. Once done, iron your waistband up, making a clean line. Continue to iron the fold of the waistband extending out to the ends.

Step 10: Find the center of your bib, by folding and marking, just like the others. Line the center with your waistband center. Pin them together and stitch along the edge of the bib. Iron flat after you make your stitch. Continue to iron the fold of the waistband extending out to the ends. (If you are making a half apron skip to next step)

Step 11: Take other piece of your waistband and place it on top of the bib on the back side of your apron. Lay it so that the wrong side is facing you. Pin it to the bib/waistband raw edge of your apron and all the way out to the ends of the front waistband and stitch. Iron your waistband up.

Step 12: Iron the waistband down, so the raw edge is pointing down, using the same seam allowance you used with the front waistband. Pin all the way across from the front waistband, over the layers on the bottom, and to the other side of the waistband. This creates a clean, professional look to your apron. Iron after you stitch them all up.
Step 13: Sew your ties together. Fold each in half, right side together, and stitch up the raw edge. Take a safety pin and turn each inside out. Iron flat. With the waist ties, tuck one end in on each piece and stitch it closed. With the necktie finish both ends.

Step 14: Tuck in your waistband pieces and put your waist ties in the opening and pin in place. Stitch both sides closed. (If you're making a half apron, this is your last step!)

Step 15: Take a safety pin and string your necktie through the opening on your bib.

And that's it!!!!!!
I also made a second one for my other niece so they could have aprons together and play house. I love how they both turned out and it really will be something that they will use for a very long time!
Just so you guys know, it has taken me all week to get this tutorial finished! Both of my kids are sick this week, I am incredibly sleep deprived, and I'm a bit sluggish because of all the things I've been staying up late to make. I'll post pictures tomorrow...hopefully, of all my creations that I've made so far. I only have a handful left to make, but they won't take me much time to do, so I am way ahead of schedule than I was last year! Hope you all are enjoying your season!

LinkWithin

Related Posts Plugin for WordPress, Blogger...