Thursday, June 24, 2010

Easy, High Impact, Cheap Canvas Wall Art Tutorial

Hello there! I have been a busy little bee as of late! Making things for the kids rooms' and repurposing clothes for all of us (more on that later). One thing that I have been wanting to do is some wall art for the little man's "Route 66" room. I have painted it a... well, I guess the only way to really describe it is to call it "Cookie Monster Blue." No joke. But when all the furniture and new carpet is in there, you will love it as much as I do! And even if you don't... I love it, so that's all that matters. My poor children have to suffer because I grew up with only white walls at all times. So I go a little crazy in the color department at times because I want lots of color in my house. Onto my post!!!

Material Needed:
*Canvas (I got mine at Michaels as a 2-pack for $4.49! Score!) Use whatever size you want.)
*Craft Paint
*Sponge Brush and Fine Tip Brush
*Freezer Paper (You can also use Contact Paper if you wanted as well. You just need something that will stick onto your canvas.)
*Cricut Cutter (You don't have to use it at all! I just did because I can. You can also print off the image you want and use a razor cutter to cut along the outside.)
*Iron
Step 1: Cut out your image you want out of the freezer paper. Easy.
Step 2: Place the Freezer Paper (waxy side down) onto your canvas, then with your iron set on the hottest heat setting and NO steam iron your image onto your canvas.
** Tip: Because the canvas has an empty back it is hard to get your iron to evenly go over the wax paper. So I took a hard back book, placed a towel/fabric over the top, and put the canvas over the top of the book. I'm sure there are easier ways or more proper ways of doing it but I had to think on my toes and used what I had on hand!
This is the towel over the book.

Step 3: After ironing, being very careful not to burn your finger tips off, run your finger or the back of a butter knife over the edges of the wax paper to make sure that the edges are on tight. If they aren't, just take the iron over it again.
Step 4: PAINT! Take your brush and move out from the center of your Freezer Paper, making sure not to lift the edge of your paper. This will allow your edges to be more straight, however you will probably have to go over it with a fine tip brush after you lift your stencil up.
Step 5: The hardest part.... wait. Make sure your paint is completely dry before lifting your stencil up.

Step 6: If your edges aren't real straight, go over it with a fine tip brush. I have the most unsteady hand in the history of the world, so if I can do it, so can you! Just go slow and make small strokes with your brush. Work from the inside details and work your way out. Then wait for it to dry and then you are done!!!
As you can see the edges are a little spotty here.

Here are my finished products for the little man's room.
Here are all three that I did with the same technique.


The next one I am making is for my daughter's room and I'm thinking I'm going to use spray paint! I will keep you posted!


Funky Junk's Saturday Nite Special

Sunday, June 13, 2010

Farm Chick Sale Finds

I know that I'm over a week late in posting this, but we had our annual garage sale over the weekend and the thought of pulling more stuff out was just not going to happen for me. So here's my loot!!! I swear to you all that that show is the best, most fun, most inspiring place I have ever been to! So many people, so many booths with TONS of eye candy, and all the vendors were so nice and helpful! Lots of fun! I highly recommend saving up your dollars and heading to Spokane, WA next June! You will not be disappointed!

I got these fun license plates and road sign for the boy's "Route 66" themed room that I'm doing. I love the rust on the green one! People looked at me when I grabbed it like I was crazy!
I got this little wonder from a booth that was next to the Vintage Barn Rolaine at the Vintage Barn is doing her very popular barn sale July 10th, so if you are in the North West, you don't want to miss it!!! But this item was made from barn wood. I am going to fill it with some moss or something and put candles in it on my kitchen table.
I got this little gem from the wonderful ladies at Funky Junk These ladies had the coolest stuff! I just wandered around to look at all the cool things they had! This is also going in the boy's room.
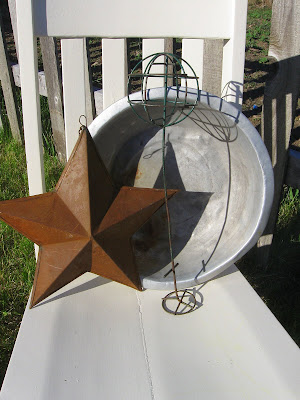
Now I have been looking for a rusty star for some time, so when I saw this one I squealed! Literally! It made people turn and look at me. The stick/sphere thing is going to get some TLC and become a topiary for my girl's room. The fun tin pan in the back is going to get some chicks and hens planted in it. I have a white one that needs a friend.
I have been looking for an old crate for some time as well! When I saw this I was hooked by its fun and bright colors. Now, I am more of a Pepsi gal, but I love this so much with its metal detail and red and yellow print. Love it!
This was my all time favorite piece of the day. It's a child sized rocking chair. It was only $24!!! This is going in my girl's room and she loves it!
Here is the link to photos of the show itself. I brought my camera but apparently I didn't check the batteries, so I was unable to take any pictures :(

My next post will be of my garage sale cast offs that I got for FREE!!!! I have a very tight budget for these kids rooms, so when we find things for free, you grab it up!!!

Monday, June 7, 2010

New Pretty in My House

I did this project as a diversion from the carseat cover I was doing. I had reached a point when I needed to look at something other than seams. Do you ever get that way? Hmmm, maybe its just me. So to help me on my way to procrastinating I made one of the oh-so-popular Book Wreaths! You can find the tutorial here at Living with Lindsay. She also sells them in her Etsy shop, if you don't want to make it. I was so happy with how it turned out and it was so easy, just be prepared to have burned finger tips. Or maybe that's just me again.
What a great gift this would make as a wedding gift?! And very inexpensive to make!

My Button!

I finally figured out how to get a button for my blog on here! I had it up, but had a few people tell me it didn't work. DOH! So go ahead and put it on your blog!

P.S. I went to the Farm Chick Sale over the weekend and found some awesome things! I'll post about it later!

LinkWithin

Related Posts Plugin for WordPress, Blogger...